If your kitchen sink is old, stained, leaking, or simply outdated, replacing it can give your kitchen a fresh, functional upgrade. It might seem like a job best left to a plumber, but with the right tools and step-by-step guidance, many homeowners can take it on themselves. Knowing how to replace a kitchen sink is also useful when preparing a home for sale, as a new sink can boost both appeal and value.
However, during inspections, we often see mistakes that could have been avoided with better planning. So, whether you’re tackling this project for the first time or simply brushing up on your skills, this guide will walk you through the entire process safely and effectively.
Why Replace Your Kitchen Sink
There are plenty of reasons to replace a kitchen sink. Maybe it’s leaking, chipped, or rusted. Maybe you’re switching from a shallow sink to a deep basin, or upgrading to a stylish under-mount model. Sometimes, homeowners decide to replace their sink as part of a larger renovation or when replacing countertops. Whatever your reason, it’s important to understand that a kitchen sink isn’t just a fixture—it’s part of a system that includes plumbing, sealants, and possibly electrical components.
What You’ll Need to Get Started
Before you begin the process, gather the tools and materials you’ll need. Preparation is key to making this project go smoothly. When everything is within reach, you’re far less likely to make mistakes or get stuck mid-task.
You’ll likely need:
- Adjustable wrench
- Pipe wrench
- Screwdriver
- Utility knife
- Plumber’s putty or silicone caulk
- Plumber’s tape
- Bucket and old towels
- Safety gloves
- New kitchen sink and faucet
- Flexible supply line hoses (if replacing old ones)
If your kitchen sink setup includes a garbage disposal or dishwasher, keep the manufacturer’s instructions close by, especially if you’re not familiar with reconnecting these systems.

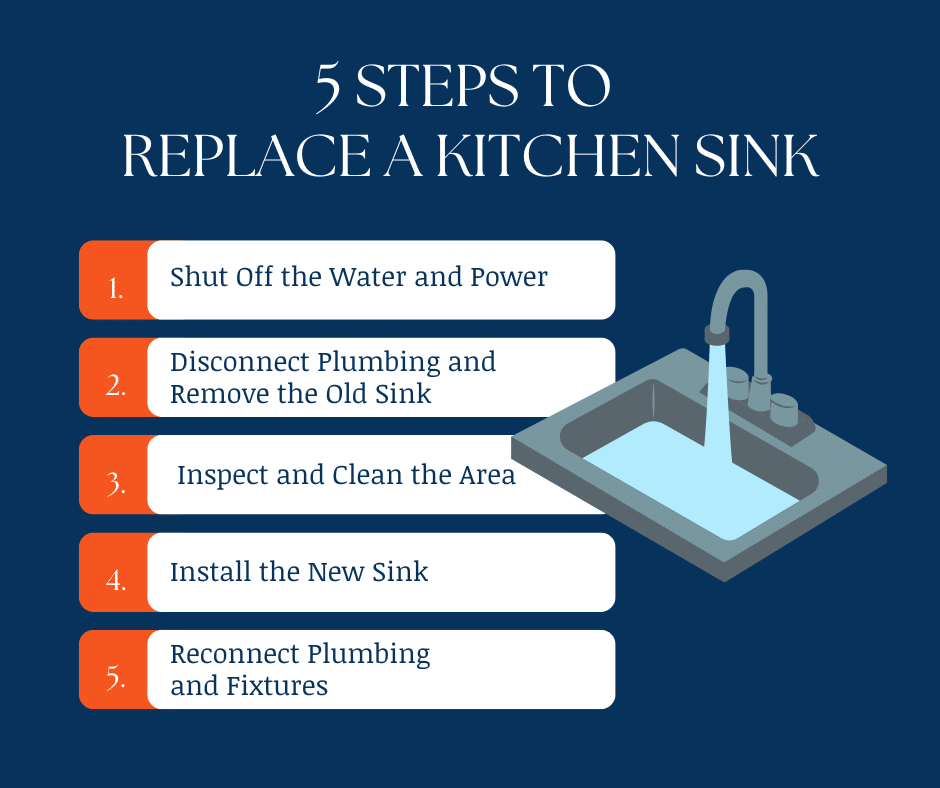
Step One: Shut Off the Water and Power
The very first step in learning how to replace a kitchen sink is turning off the water supply. Most sinks have shut-off valves under the cabinet. Turn them clockwise to stop water flow. If your home doesn’t have shut-off valves at the sink, you’ll need to shut off the main water supply.
If your sink has a garbage disposal, shut off the power at the breaker box to prevent any risk of electric shock. Safety comes first, especially when dealing with water and electricity in the same space.
Step Two: Disconnect Plumbing and Remove the Old Sink
Now that the water is off, place a bucket underneath the sink to catch any remaining water in the pipes. Lay towels around the area to protect your cabinet and floor. Disconnect the water supply lines using your adjustable wrench. Next, loosen and remove the drain pipes connected to the sink’s strainer. If you have a garbage disposal, remove it following the manufacturer’s instructions. You may also need to disconnect the dishwasher drain line if it’s connected to the sink drain.
After removing all connections, locate the clips or mounting brackets underneath the sink. These hold the sink to the countertop. Use a screwdriver or wrench to loosen and remove them. Once the clips are removed, cut through the old sealant around the edges of the sink using a utility knife. Carefully lift the sink out of the countertop. Depending on the size and weight of the sink, you may need an extra set of hands.
Step Three: Inspect and Clean the Area
Before installing the new sink, inspect the countertop and cabinet area thoroughly. Look for any signs of water damage, mold, or rot. As home inspectors, we often find hidden damage around sinks—especially when leaks have gone unnoticed for long periods. If you notice anything that looks suspicious, it’s a good idea to address it before continuing. Replacing a kitchen sink on top of damaged wood or moldy surfaces won’t fix the underlying problem.
Clean off any remaining sealant or debris from the countertop opening. The new sink needs a clean, even surface to form a tight, leak-proof seal.
Step Four: Install the New Sink
Now it’s time for the new sink. Begin by placing it into the countertop opening to check the fit. If it doesn’t fit snugly, you may need to slightly widen the cutout—but do so carefully. Always measure before cutting. Once the fit is confirmed, apply a bead of plumber’s putty or silicone caulk around the rim of the sink or the underside edge, depending on the model.
Carefully lower the sink into place, making sure it sits evenly and securely in the opening. Press down gently so the sealant spreads and forms a tight bond. From underneath the sink, use the mounting clips or brackets to secure the sink to the countertop. Tighten them gradually, alternating sides, so the sink pulls down evenly.
Wipe away any excess putty or caulk that squeezes out. Let it sit for the recommended curing time before moving on to plumbing connections.
Step Five: Reconnect Plumbing and Fixtures
Next, install the faucet and any other components if they aren’t already attached. Secure the faucet base with a gasket or plumber’s putty to ensure a watertight fit. Connect the water supply lines from the shut-off valves to the faucet using an adjustable wrench. Apply plumber’s tape to threaded connections to prevent leaks.
Reconnect the drain pipes and reinstall the garbage disposal if you had one before. If your dishwasher drain hose connects to the sink or disposal unit, reattach it now. Make sure all pipes are tight, but don’t over-tighten, as this can crack plastic fittings or strain connections.
Once everything is hooked up, slowly turn the water back on. Let it run for a few minutes while you check under the sink for leaks. Test both hot and cold water, run the garbage disposal (if applicable), and make sure the drain flows freely. You’ve officially completed the main steps in how to replace a kitchen sink.
Final Touches and Clean-Up
After installation, wipe down the sink and surrounding countertop. Clean up any remaining putty, tools, packaging, or debris. Keep an eye on the area under the sink for the next few days. Even a small drip can cause major damage over time. Replacing a kitchen sink is only as successful as the final checks. If something doesn’t feel right, don’t ignore it. Fixing a small issue now can save you hundreds or even thousands later.
Common Problems and What to Watch Out For
Homeowners often run into a few avoidable issues while learning how to replace a kitchen sink. Being aware of these ahead of time can save you a lot of trouble.
Here are some of the most common problems:
- The new sink doesn’t fit the existing countertop opening
- Plumbing connections leak due to poor seals or old fittings
- Shut-off valves are rusted or damaged
- Garbage disposal installation is incomplete or loose
- Old drain pipes don’t match the fittings of the new sink
Leaks, in particular, are a problem we see during many home inspections. Often, they go unnoticed for weeks or months, soaking the wood beneath the sink. If you’re doing this yourself, check everything twice—especially under the sink.
When to Hire a Pro Instead
There are situations where replacing a kitchen sink becomes more than a DIY job. If your installation includes changes to the size or style of the sink—such as switching to an under-mount or farmhouse design—you’ll likely need countertop modifications. That’s not something most homeowners are equipped to handle.
Other reasons to hire a professional include:
- Corroded or stuck shut-off valves
- Extensive plumbing that needs re-routing
- Signs of mold or wood rot under the sink
- Difficulty installing or rewiring a garbage disposal
- Uncertainty about codes or safety regulations
It’s always better to bring in an expert than risk damaging your home’s plumbing or electrical systems. As home inspectors, we’ve seen the damage an improperly installed sink can cause, from mold growth to cabinet collapse. If you’re unsure at any point, make the call.
Book a Home Inspection Before You Renovate
If you’re upgrading your kitchen or unsure about your plumbing’s condition, a professional home inspection can give you peace of mind. We’ll check your supply lines, drainage system, and even test for moisture beneath your cabinets—something most homeowners miss.
Understanding how to replace a kitchen sink is valuable, but knowing when to get a second opinion is even smarter. Contact our team today to schedule a comprehensive home inspection and make sure your next home improvement project is built on a solid foundation.